Translate

Friday, November 29, 2019

Vegetarian tart

With November comes cold weather, Thanksgiving , pies and tart baking.
While browsing for savory pies I came across a recipe "Autumn tart" which I baked for a friendsgiving pie/baking contest which I eventually couldn't attend.

Tart Crust:

1 1/4 cup Besan/Chickpea flour
2/3 cup    Maida/All purpose flour
2 Tbsp     Corn Starch
1 tsp         Dry Thyme
3 tsps       Black pepper powder
1 tsp        salt
6 tbsps    canola oil
6 tbsps    Ice cold water


Filling:

Red Onions      1/2 cup(finely chopped)
White Onions   1/2 cup(finely chopped)
Celery               1/2 cup ( chopped)
Mushrooms       6 (finely chopped)
Leeks                 1 tbsp (finely chopped)
Garlic greens     1tsp (finely chopped)
Carrots               1/2 cup (finely chopped)
Salt per taste
Spice powder      1 tsp ( I used homemade sambar powder)
Oil for sauteing vegetables


Making the crust:

Mix the flours, corn starch, salt , spices with your hands . Add the oil and water slowly to form a dough. Make it into a ball and refrigerate for 30 minutes.
After 30 minutes preheat the oven to 400 F. Grease the baking pan and press down the tart dough evenly along the pan. Use dry flour if dough is sticky. Prick the bottom with a fork to allow ventilation to prevent the dough from puffing up. Bake for 20 minutes or until the crust is light brown.

Filling:
While the crust is baking,  heat a pan. Once the pan is hot add oil. Add the onions and saute till light brown. Then add the chopped celery , mushrooms and celery  with the salt and spices. Saute for about 5-7 minutes until the mushrooms well sauteed. Then add the carrots cook covered until it softens.
When the tart is done remove from the oven, let it cool. Fill the tart with the filling, add some cheese.
Toast for about 5 minutes until cheese melts and serve.


Tips:
1.Use some dry flour on a cutting board to roll into dough if too sticky before refrigeration.
2.The vegetables can be what is available during the season.
3. I flattened out the leftover dough to make some snack bites.


Thursday, July 11, 2019

Apricot Plum cake

It has been a long dormancy for the blog.
What better way to break it with a homemade apricot plum cake.
Belated July 4th to my American readers.


I made this cake for July 4th to celebrate America's 243rd year of Independence.

Ingredients:
All purpose flour             - 1 1/4 cup
Atta( whole wheat flour) - 1/2 cup
Plums                              - 4 ( peel off skin , scoop out the flesh)
Apricots                           - 2 ( peel off skin , scoop out the flesh)
Yogurt(curd)                    - 1/2 cup
Sugar                               - 1/2 cup
oil                                     - 2/3 cup
Baking powder                - 1 tsp
Baking soda                    - 1/2 tsp
Apple cider vinegar         - 1 tbsp
Cardamom powder          - 1/2 tsp
Nutmeg powder               - 1/4 tsp 
Salt                                   - 1/4 tsp
Almonds                           - 1/2 cup(chopped)


Method:

Mix the dry ingredients - the flours, baking powder, salt, cardamom, nutmeg and sugar in  a bowl.
Preheat the oven to 350 F. Grease a baking pan.
In a separate mix the oil/butter/yogurt/vinegar and the fruits together. Fold in the dry ingredients into the wet ingredients taking care not to beat the mixture too much. At the end fold in the almonds.
Add the baking soda and mix gently. Pour into the baking pan and bake for 45 minutes or until done.
I baked mine in 2 pans.


Tips:
1.The original recipe used soy milk and vinegar. I replaced it with yogurt and half the quantity of vinegar.
2. I used a mix of oil and melted butter in the ratio 2:1.
3. My plums and apricots were very ripe so i was able to scoop the flesh out. you can chop them if they are firmer as per the original recipe.
4. I used a little more flour than the original recipe to make it the right consistency for a cake batter.
5. Flavoring with unsweetened chocolate or cocoa powder will add to the taste of the cake.

Recipe source
https://www.vegrecipesofindia.com/eggless-plum-cake-recipe/


Thursday, May 31, 2018

Raw Papaya pickle


Raw Papaya in its texture and appearance mimics raw mango.
The papaya we bought was used to experiment one of the favorite south Indian pickles Manga Kari.☺.

Ingredients:

Raw Papaya                              -  1 medium size
Red chilli powder                       - 1-2 tsp
Salt                                             - as per taste
Turmeric powder                        - 1 tsp
Lime juice                                  - 1 small lime
Gingelly oil(refined sesame oil) - 1 tsp
Asoefatida .                                - 1 small pinch
Mustard seeds                           - 1 tsp

Chop papaya into small strips(julien) as shown in the picture below.


Then add salt and keep it closed in a cool place, not refrigerated. After a day add the chilli powder, lime juice and mix well and refrigerate for about   2-3 days until it softens.


Spices added 
Non

Ready to eat πŸ™‚

Once it is softened, heat the oil , add mustard seeds and asoefatida. Once the mustard seeds splutter add this to the papaya and mix well. Bottle this in a sterilized container. Store in refrigerator. Stores well for 2 weeks.


Tips:
1. Mix the papaya well every few hours until it is bottled to avoid moisture retaining in one part of the bowl.
2. Store in a cool dark place away from too much heat and light.
3. You can try with half ripe papaya if you like a sweet and spicy pickle.
4. The red chili powder can be added to suit your taste.


Monday, March 5, 2018

Date almond eggless cake

Happy 2018 to all.
This is my first post for the year. It has been a busy start to the year and before I realised it is already MarchπŸ™‚. I am starting off with a cake recipe which I baked for my son’s ninth birthday. This recipe reminds me of my first introduction to baking. It was when my mother used to bake eggless cakes for us. We used to take turns to beat the butter and the sugar as we had no processors then. This is similar to a date and walnut cake she baked.
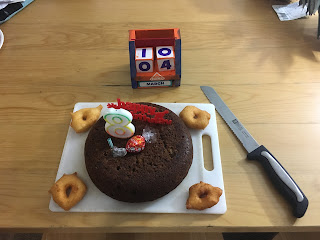
The cake turned out moist and flavorful. The birthday boy enjoyed the cake with vadai πŸ™‚:-).

Ingredients:

Wheat flour.                   -1/2 cup
Maida.                             - 1/2 cup
Raw Sugar.                     - 1/2 cup
Dates(chopped).            - 3/4 cup
Baking soda.                   - 1 tsp
Instant coffee powder - 1 tsp
Water                               - 1 cup
Butter(melted).              - 1/4 cup
Almonds(chopped).      - 1/4 to 1/2 cup
Salt.                                  - 1/4 tsp
Cardamom powder.      - 1 tsp

Steps to make the cake

Boil the dates with the water and sugar in medium heat until it all blends together.Let this cool down to room temperature. In the meantime in a bowl mix the dry ingredients together and mix well. Pre heat the oven to 360 F.
Add the melted room temperature butter to the date water mixture and mix well. Now add this liquid mixture to the flour mixture and blend the ingredients together well.
Grease a baking pan and pour in the mixture.
Bake the batter for about 35-45 minutes or until a toothpick cones out clean.Mine took about 40 minutes.  Let it cool down. Serves as a snack for kids and goes well with a cup of tea or coffee.

Recipe source :
https://www.yummytummyaarthi.com/2017/11/eggless-dates-walnut-cake-recipe-christmas.html

This is the 124th post, one away from the 125th. Hooray!


Tips:

1. You can mix the instant coffee powder in the date water mix after taking off from heat and mux well. I added the it with the flour and blended it well.
2. Cocoa powder may be a good alternative to the coffee powder.
3. I melted the butter to make clarified butter(ghee). Used the melted butter from this for the recioe whike it was processing.
4.The original recipe used walnuts, cinnamon, brown sugar and oil. I replaced them with almonds, cardamom, raw sugar and butter.
5. The cake was very mild in sweetness. If you prefer more sweetness you can add a little more brown sugar or raw sugar.


Thursday, November 30, 2017

Caterpillar bread (stuffed bread )

Happy thanksgiving!

Finally posting a recipe which was long due since we made this thanksgiving to mimic the vegetarian version of the stuffed bird. We made this after a long time and it turned out very soft  and appreciated by our guests for thanksgiving dinner. The bread dough was made by husband who likes making different varieties of bread.
We did not take a lot of pictures for the one made for Thanksgiving dinner.

Ingredients:
Gluten                     - 1 cup
Wheat flour            - 1 1/2 cups
Bajri flour                - 3/4 cup
Yeast                        -  1 1/2 tbsp 
Salt                           -  1 tsp
butter or spread     -  1 tbsp
Milk                           - 1/2 to 1 cup


Stuffing for Thanksgiving dinner loaf:

Sweet potato            -  1 small (peeled)
Onions                       -  1 small (red/white/ pink)
Pablano peppers      -  1/2 of a big
Celery                         - 1 stalk
Carrots                       - 1 small (wash and peel)
Ginger                        -  1/2 inch piece (chopped about 1 tbsp)
Garlic                          - 4-5 cloves
Mushroom                - 1 big portobello
Salt                             - as per taste
Oil                              -  2 tsp
Spices of choice


Stuffing for post Thanksgiving weekend breakfast:

Leftover green beans stir fry  - 1 cup

Steps to make the bread dough:

Mix the dry ingredients together in the food processor and gradually add the milk and butter so that they blend well to form a smooth soft dough.  Knead for a coupleof minutes by hand or run it for a minute on the dough setting in the processor. Place it in a vessel and set it in a warm place covered until it doubles. We left ours overnight.
While the dough is rising , the stuffing can be prepared.

Stuffing:

Wash and finely chop the vegetables. Heat oil in a pan and saute well with salt and spices of choice. For the mixed vegetable stuffing I used coriander powder, black pepper powder and turmeric powder. Cook well covered with little to no water. The stuffing should be dry.
The green beans stir fry was made by a friend for Thanksgiving dinner.


Asembling the stuffing inside the bread:

Once the dougn doubles knead it with hand for a minute and divide into 2 parts.
Roll out the dough with a rolling pin to about 1/4 inch thickness. We rolled it in an oblong shape as  in the picture below.
Make lines on one side as shown below.


Preheat the oven to 400 F while getting the bread ready for baking.
Place the stuffing on the side without the cuts and fold as in the images below. Initially folding the uncut side and then the cut side. The dough will be sticky enough so that the strips will stick onthe uncut end.


Place on an aluminum foil or greased baking tray until well done. Took about 35-40 minutes for us. The tops and sides will be light to dark brown evenly.  In between while baking turn over and brush milk/oil mix to avoid drying on the outside. 
Switch off oven and let it cool on the oven rack for about 10-15 minutes. 

Take it out and let it rest for sometime until warm enough to touch. Then cut them and serve as such or with cheese or any favored sauces.


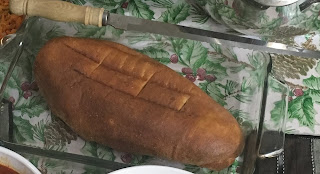
Bread made on Thanksgiving. This one has the stuffing in the center and then the dough folded over it.


Tips :

1.Thegluten proportion is vital in this recipe as that privides the stickiness for sealing and texture forthe bread.
2. The stuffing can be your choice as long as it is well done and dry.


Wednesday, October 18, 2017

Chocolate khoya peda

Happy Deepavali!
Renewing my blogging after a long gap on this festive day. I tried out the chocolate peda with homemade khoya with inspiration from Raks kitchen recipe. This recipe turned out to be a quick and easy one and well suited my limited time for festive preparation due to work and home.

Homemade khoya ingredients:

Non fat milk powder.               - 1 1/2 cups
Whey protein.                            - 1/2 cup
Milk.                                             - 1/2 cup
Ghee(clarified butter)               - 2 tbsp

Ingredients for peda:

Homemade khoya                        - 2 cups
Unsweetened cocoa powder      - 1 tsp
Sugar.                                              - 1/4 cup
Ghee or butter                                - 1 tsp
Elaichi powder.                              - 1 tsp(2-3 elaichis)
Almonds(chopped).                      - 1/4 cup
Salt.(optional)                                - a small pinch
Toasted Pistachios( chopped)    - 1 tbsp


Steps to make Khoya:

Heat the milk and the ghee in a pan just enough to start boiling. Take off heat. In a bowl add the milk powder and whey protein powder and mix well. Add the warm milk to this milk powder mix and stir till it all blends into one thick mass. This can be made  into desired shape hile warm and refrigerated for future use. As it cools it will retain that shape.

Steps to make peda:

Heat a thick bottomed vessel in low heat. Add the khoya, cocoa powder, sugar, almonds, ghee and elaichi powder. If the mixture is too thick add 1-2 tsp of milk or water as desired. Mix them well to remove all lumps and to form one smooth mixture. Raise the heat to medium and keep stirring.Once the mixture becomes more of a liquid reduce the heat. The mixture will thickens, at this point add the salt. Stir until the mixture leaves the bottom and sides of the pan as one whole solid mass. Switch off the heat and transfer to another flat plate or pan to let it cool.
Once cool enough to handle, grease your hands and start rolling them into balls and place them on a parchment paper. Flatten them into 1/4 inch thick circles. Decorate the center with chopped pistachios. Refrigerate for 30 minutes to an hour before serving.

Tips:

1. The original recipe for khoya suggested using full fat milk powder.
2. Whey protein was an optional addition which I tried, if you dont have it you can just use milk powder.
3. I refrigerated the mixture for about 15-20 minutes before rolling them.
4. Allow the mixture to cool well before rolling into balls else it will be hard to shape it.
5. Reduce heat of pan once mixture thickens to avoid clumping and the mixture burning or becoming harder in texture.
6. Transfer to plate in room temperature or you can chill the plate before transfering from pan. This will stop the cooking in the mixture and get you the right texture for shaping.


Tuesday, May 9, 2017

Nopales yogurt gravy(Indian style)

Nopales is a cacti native to Mexico desert region and finds its way into many of their cuisine. It is available in the local stores here in the chopped form which makes it convenient to cook. Tried an Indian recipe with it. It is very similar to Okra (Indian ladies finger) for it's slimy texture.

http://www.nutrition-and-you.com/nopales.html

Ingredients
Nopales                  - 1 cup(chopped)
Onions                    - 1/2 cup (chopped)
Tomato.                  - 1 small (chopped)
Asoefatida.             - a small pinch
Turmeric powder - 1 tsp
Water.                      - 3/4 cup or as needed
Salt.                          - as needed
Oil                             - 2 tsp

To grind:
Yogurt/curd            - 1/2 - 3/4 cup
Mint                         - 4-6 leaves(homegrown)
Green chillies         - 1
Cumin(jeera).         - 1/2 tsp

To temper:
Mustard seeds       - 1 tsp
Jeera.                       - 1/2 tsp
Curry leaves.          - 3-5 leaves

Store bought Nopales
Heat a pan, I did mine in a pressure cooker.
Add 1 tsp oil of choice, once hot add mustard seeds and jeera. Add the chopped onions once the mustard seeds splutter and saute well.
Now add the Nopales and saute for  2-3 minutes. Add the chopped tomatoes and let them blend well for a few minutes. Add the salt and water and close the pressure cooker lid. Let it cook for 2 whistles. Switch off and let it rest until the pressure comes down. In the meantime grind the ingredients to a smooth paste.
Once the pressure is released from the cooker add the ground ingredients and let it simmer in low heat for about 5 minutes and switch off. It can be served with rice, noodles or Indian bread.

Gravy ready to serve

Tips:
1. Green chillies can be replaced with red chillies.
2.Yogurt can be replaced with fresh coconut or coconut flour or a handful of almonds.
3. Any other veggies like chopped zucchini/radish can be added.
4. If you are cooking on regular pan/pot close the lid and let it cook until well done, simmer and add ground ingredients.
My inspiration to cook in the pressure cooker was the OPOS (one pot one shot) method of cooking.
5. You can use coriander/cilantro leaves instead of mint leaves.